The January 2011 Daring Bakers’ challenge was hosted by Astheroshe of the blog accro. She chose to challenge everyone to make a Biscuit Joconde Imprime to wrap around an Entremets dessert.


Since I knew this was going to be complicated I tried to keep it simple. I used the recipe for the joconde from Astheroshe. Then while researching this dessert I found these beautiful mini entremets/charlottes over at Martha Stewart. I really wanted to recreate them but remember I said I wanted to keep it simple. So instead I took a few things from Martha, a few from myself and the rest from the Daring Bakers and created my Bittersweet Grand Marnier Mousse Entremet. Someday I'm going back and I will recreate those sweet little charlottes over at Martha Stewart ! Until then here are the components for:
Bittersweet Grand Marnier Mousse Entremet
Chocolate Piping Batter
Pate a Cigarette Batter
Courtesy of Martha Stewart
Ingredients
Makes about 2 cups
1 stick unsalted butter, cut into pieces, room temperature
1 cup confectioners' sugar, sifted
4 large egg whites, room temperature
1/4 teaspoon pure vanilla extract
3/4 cup plus 1 tablespoon all-purpose flour
1/3 cup unsweetened Dutch-process cocoa powder, sifted
1.Process butter and confectioners' sugar in a food processor until fluffy. While machine is running, gradually add egg whites and vanilla, and scrape down sides of bowl. Add flour, and process until combined.
2.Transfer to a bowl, and stir in cocoa powder with a rubber spatula. For piping, transfer to a pastry bag fitted with a 1/16-inch plain round tip (such as Ateco #2). Piping batter can be refrigerated in an airtight container for up to 3 days; bring to room temperature and stir before using.

Joconde Sponge
Courtesy Astheroshe
Yield: Two ½ size sheet pans or a 13” x 18” (33 x 46 cm) jelly roll pan
Ingredients:
¾ cup almond flour/meal
½ cup plus 2 tablespoonsconfectioners' (icing) sugar
¼ cup cake flour 3 large eggs - about 5⅓ oz/ 150g
3 large egg whites
2½ teaspoons white granulated sugar or superfine (caster) sugar
2 tablespoons unsalted butter, melted
1.In a clean mixing bowl whip the egg whites and white granulated sugar to firm, glossy peeks. Reserve in a separate clean bowl to use later.
2.Sift almond flour, confectioner’s sugar, cake flour. (This can be done into your dirty egg white bowl)
3.On medium speed, add the eggs a little at a time. Mix well after each addition. Mix until smooth and light. (If using a stand mixer use blade attachment. If hand held a whisk attachment is fine, or by hand. )
4.Fold in one third reserved whipped egg whites to almond mixture to lighten the batter. Fold in remaining whipped egg whites. Do not over mix.
5.Fold in melted butter.
6.Reserve batter to be used later.
Preparing the Joconde- How to make the pattern:
1.Spread a thin even layer of décor paste approximately 1/4 inch (5 millimeter) thick onto silicone baking mat with a spatula, or flat knife. Place mat on an upside down baking sheet. The upside down sheet makes spreading easier with no lip from the pan.
2.Pattern the décor paste – Here is where you can be creative. Make horizontal /vertical lines (you can use a knife, spatula, cake/pastry comb). Squiggles with your fingers, zig zags, wood grains. Be creative whatever you have at home to make a design can be used. OR use a piping bag. Pipe letters, or polka dots, or a piped design. If you do not have a piping bag. Fill a ziplock bag and snip off corner for a homemade version of one
3.Slide the baking sheet with paste into the freezer. Freeze hard. Approx 15 minutes.
4.Remove from freezer. Quickly pour the Joconde batter over the design. Spread evenly to completely cover the pattern of the Décor paste.
5.Bake at 475ºF /250ºC until the joconde bounces back when slightly pressed, approx. 15 minutes. You can bake it as is on the upside down pan. Yes, it is a very quick bake, so watch carefully.
6.Cool. Do not leave too long, or you will have difficulty removing it from mat.
7.Flip cooled cake on to a powdered sugared parchment paper. Remove silpat. Cake should be right side up, and pattern showing! (The powdered sugar helps the cake from sticking when cutting.)
1.Start with a large piece of parchment paper laid on a very flat baking sheet. Then a large piece of cling wrap over the parchment paper. Place a spring form pan ring, with the base removed, over the cling wrap and pull the cling wrap tightly up on the outside of the mold. Line the inside of the ring with a curled piece of parchment paper overlapping top edge by ½ inch. CUT the parchment paper to the TOP OF THE MOLD. It will be easier to smooth the top of the cake.
1.Trim the cake of any dark crispy edges. You should have a nice rectangle shape.
2.Decide how thick you want your “Joconde wrapper”. Traditionally, it is ½ the height of your mold. This is done so more layers of the plated dessert can be shown. However, you can make it the full height.
3.Once your height is measured, then you can cut the cake into equal strips, of height and length. (Use a very sharp paring knife and ruler.)
4.Make sure your strips are cut cleanly and ends are cut perfectly straight. Press the cake strips inside of the mold, decorative side facing out. Once wrapped inside the mold, overlap your ends slightly. You want your Joconde to fit very tightly pressed up to the sides of the mold. Then gently push and press the ends to meet together to make a seamless cake. The cake is very flexible so you can push it into place. You can use more than one piece to “wrap “your mold, if one cut piece is not long enough.
5.The mold is done, and ready to fill.
*Note: If not ready to use. Lay cake kept whole or already cut into strips, on a flat surface, wrap in parchment and several layers of cling wrap and freeze.

Entrement- Filling Options:
It is nice to have a completed dessert so you can unmold and see the Joconde working. Fill with anything you desire. Layers of different flavors and textures! However, it needs to be something cold that will not fall apart when unmolded.
Suggestions:
Mousses, pastry creams, Bavarian creams, cheesecakes, puddings, curds, jams, cookie bases, more cake (bake off the remaining sponge and cut to layer inside), nuts, Dacquoise, fresh fruit, chocolates, gelee.
Espresso Syrup
Courtesy of Martha Stewart
Makes about 2/3 cup
1/2 cup freshly brewed strong espressoMakes about 2/3 cup
1/4 cup sugar
1/4 cup water
Bring espresso, sugar, and water to a boil in a saucepan, stirring to dissolve sugar. Let cool. Syrup can be refrigerated in an airtight container for up to 2 weeks.
Milk Chocolate Ganache
Courtesy of Martha Stewart
Makes about 2 cups
8 ounces good-quality milk chocolate, finely chopped
1cup heavy cream
1.Put chocolate into a heatproof bowl. Bring cream to a simmer in a saucepan. Pour over chocolate. Let stand for 10 minutes, then whisk until smooth. Let cool, whisking occasionally. For piping, immediately transfer to pastry bag fitted with a 1/4-inch plain round tip (such as Ateco #802). Use immediately.
Bittersweet Chocolate Mousse
6 ounces of good quality bittersweet chocolate-finely chopped
6 Egg yolks
3/4 cup Sugar
1/3 cup Grand Marnier liqueur
1 1/4 cup Chilled whipping cream
Stir the chocolate in double boiler over barely simmering water until smooth and melted. Cool to lukewarm. using electric mixer, beat yolks to blend in mixing bowl. Gradually add sugar and beat until pale yellow and slowly dissolving ribbon forms when beaters are lifted. Blend in Grand Marnier, then melted chocolate. Whip cream in another bowl until soft peaks form. Fold 1/3 of cream into chocolate mixture. Gently fold in remaining cream. Pour mixture into the entremet, smoothing top. Freeze until set, about 30 minutes.
Shiny Chocolate Glaze
Courtesy of Martha Stewart
Makes about 1 1/4 cups
6 ounces good-quality bittersweet chocolate, finely chopped
1/3 cup sugar
1/2 cup freshly brewed coffee
2 tablespoons light corn syrup
1 teaspoon coarse salt
2 tablespoons unsalted butter
1.Bring chocolate, sugar, coffee, corn syrup, and salt to a boil in a saucepan, stirring to melt chocolate. Reduce heat, and simmer, stirring occasionally, until thickened, about 5 minutes. Remove from heat, and stir in butter. Let cool, stirring occasionally, until barely warm but still pourable, about 20 minutes. Use immediately.
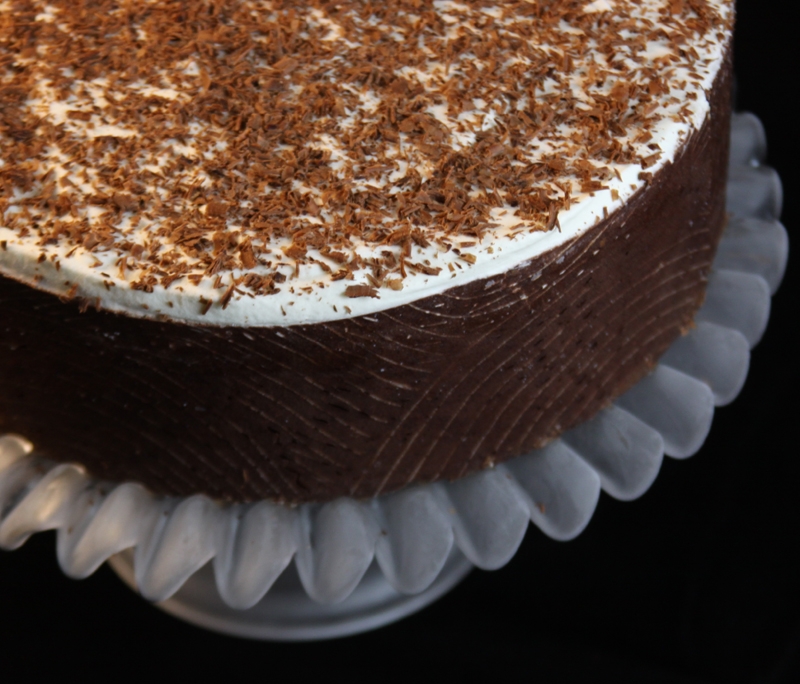
Optional topping: 2 cups of whipped cream , whipped to soft peaks . Spread onto of the chilled entremet and then shave some dark chocolate over the whipped cream topping.

Assembly:
1.Follow Astheroshe's directions for filling the mold, including using the leftover joconde scraps to line the bottom of the mold.
2.Take the espresso syrup and dab it onto the sides and bottom of the joconde
3.Pour about 1/2 inch of the milk chocolate ganache into the bottom of the mold.
4.Freeze until the ganache is firm-about 30-45 minutes
5.Add the Grand Marnier Mousse
6.Freeze until the mousse is firm about 45 minutes- 1 hour
7.Top with the shiny chocolate glaze and place back in freezer for about 20 minutes.
8.Carefully remove the spring form mold-you may have to quickly heat the outside of the ring with a hair dryer-do this briefly and quickly so that you don't melt your beautiful creation.
9. If you made the optional whipped cream topping, spread that over the top now leveling it out with a spatula then shave some dark chocolate over that.
And voila your deletable Bittersweet Chocolate Grand Marnier Entremet. Bon Appetit.


10 comments:
Very nicely done! One of the best striping tools is a grouting comb that has square teeth. The hardware store is a pastry chef's friend!
I just wanted you to know that I threw a "Stylish Blogger" award your way over on my blog. Participate as much or as little as you wish, but I wanted to let you know I enjoy your posts & I think you do some amazing work.
That is beautiful and looks delicious! I keep meaning to join DB, I'm gong to sign up right now! :)
What I have been reading is that this is indeed a challenge. You rose to the occasion beautifully Sandy!!!
Stunning! Looks & sounds wonderful!
This looks like a great baking challenge. I hope some day I can make a dessert so lovely. The layers look so decadent and delicious. I love the design you did on the sides of the cake. Such a gorgeous cake! And your ruffled cake stand and dessert plate! Well, you know how I feel about pretty dish ware...
:)
Oh my gosh...that is all I could say when I first saw the picture of youb beautiful BJIE! Yep...can't pronounce it at all, but I sure would love a sample piece of this cake!!! Jorge just jumped in the car this moment and is on his way up to Seattle! Just kidding! Loved seeing Aunt Mary's china plate under such a exquisite creation!
Gorgeous! And very impressive. No kidding about the challenge part, huh?
I like decorations, very nicely finished with the swirls on the side.
YOur entremet looks lovely, and I think one can never go wrong with chocolate. :)
Post a Comment