Showing posts with label Daring Bakers. Show all posts

Wednesday, January 26, 2011

Biscuit Joconde Imprime Entremet -DB January Challenge


The January 2011 Daring Bakers’ challenge was hosted by Astheroshe of the blog accro. She chose to challenge everyone to make a Biscuit Joconde Imprime to wrap around an Entremets dessert.

Whew , that title is a mouthful ! And this challenge defined the word challenge so many ways. I have never made a biscuit joconde(A joconde imprime is a decorative design baked into a light sponge cake providing an elegant finish to desserts/torts/entremets/ formed in ring molds) before. And I have never created an entermet( an ornate dessert with many different layers of cake and pastry creams in a mold, usually served cold). So this was a real learning experience for me. Which is exactly what The Daring Bakers are all about.


Since I knew this was going to be complicated I tried to keep it simple.  I used the recipe for the joconde from Astheroshe.  Then while researching this dessert I found these beautiful mini entremets/charlottes over at Martha Stewart.  I really wanted to recreate them but remember I said I wanted to keep it simple.   So instead I took a few things from Martha, a few from myself and the rest from the Daring Bakers and created my Bittersweet Grand Marnier Mousse Entremet. Someday I'm going back and I will recreate those sweet little charlottes over at Martha Stewart ! Until then here are the components for:

Bittersweet Grand Marnier Mousse Entremet

Chocolate Piping Batter
Pate a Cigarette Batter
Courtesy of Martha Stewart


Ingredients
Makes about 2 cups
1 stick unsalted butter, cut into pieces, room temperature
1 cup confectioners' sugar, sifted
4 large egg whites, room temperature
1/4 teaspoon pure vanilla extract
3/4 cup plus 1 tablespoon all-purpose flour
1/3 cup unsweetened Dutch-process cocoa powder, sifted

1.Process butter and confectioners' sugar in a food processor until fluffy. While machine is running, gradually add egg whites and vanilla, and scrape down sides of bowl. Add flour, and process until combined.

2.Transfer to a bowl, and stir in cocoa powder with a rubber spatula. For piping, transfer to a pastry bag fitted with a 1/16-inch plain round tip (such as Ateco #2). Piping batter can be refrigerated in an airtight container for up to 3 days; bring to room temperature and stir before using.


Joconde Sponge

Courtesy Astheroshe
Yield: Two ½ size sheet pans or a 13” x 18” (33 x 46 cm) jelly roll pan
Ingredients:
¾ cup almond flour/meal
½ cup plus 2 tablespoonsconfectioners' (icing) sugar
¼ cup cake flour 3 large eggs - about 5⅓ oz/ 150g
3 large egg whites
2½ teaspoons white granulated sugar or superfine (caster) sugar
2 tablespoons unsalted butter, melted

1.In a clean mixing bowl whip the egg whites and white granulated sugar to firm, glossy peeks. Reserve in a separate clean bowl to use later.


2.Sift almond flour, confectioner’s sugar, cake flour. (This can be done into your dirty egg white bowl)

3.On medium speed, add the eggs a little at a time. Mix well after each addition. Mix until smooth and light. (If using a stand mixer use blade attachment. If hand held a whisk attachment is fine, or by hand. )

4.Fold in one third reserved whipped egg whites to almond mixture to lighten the batter. Fold in remaining whipped egg whites. Do not over mix.

5.Fold in melted butter.

6.Reserve batter to be used later.

Preparing the Joconde- How to make the pattern:
1.Spread a thin even layer of décor paste approximately 1/4 inch (5 millimeter) thick onto silicone baking mat with a spatula, or flat knife. Place mat on an upside down baking sheet. The upside down sheet makes spreading easier with no lip from the pan.

2.Pattern the décor paste – Here is where you can be creative. Make horizontal /vertical lines (you can use a knife, spatula, cake/pastry comb). Squiggles with your fingers, zig zags, wood grains. Be creative whatever you have at home to make a design can be used. OR use a piping bag. Pipe letters, or polka dots, or a piped design. If you do not have a piping bag. Fill a ziplock bag and snip off corner for a homemade version of one
3.Slide the baking sheet with paste into the freezer. Freeze hard. Approx 15 minutes.

4.Remove from freezer. Quickly pour the Joconde batter over the design. Spread evenly to completely cover the pattern of the Décor paste.

5.Bake at 475ºF /250ºC until the joconde bounces back when slightly pressed, approx. 15 minutes. You can bake it as is on the upside down pan. Yes, it is a very quick bake, so watch carefully.


6.Cool. Do not leave too long, or you will have difficulty removing it from mat.

7.Flip cooled cake on to a powdered sugared parchment paper. Remove silpat. Cake should be right side up, and pattern showing! (The powdered sugar helps the cake from sticking when cutting.)

1.Start with a large piece of parchment paper laid on a very flat baking sheet. Then a large piece of cling wrap over the parchment paper. Place a spring form pan ring, with the base removed, over the cling wrap and pull the cling wrap tightly up on the outside of the mold. Line the inside of the ring with a curled piece of parchment paper overlapping top edge by ½ inch. CUT the parchment paper to the TOP OF THE MOLD. It will be easier to smooth the top of the cake.

1.Trim the cake of any dark crispy edges. You should have a nice rectangle shape.


2.Decide how thick you want your “Joconde wrapper”. Traditionally, it is ½ the height of your mold. This is done so more layers of the plated dessert can be shown. However, you can make it the full height.

3.Once your height is measured, then you can cut the cake into equal strips, of height and length. (Use a very sharp paring knife and ruler.)

4.Make sure your strips are cut cleanly and ends are cut perfectly straight. Press the cake strips inside of the mold, decorative side facing out. Once wrapped inside the mold, overlap your ends slightly. You want your Joconde to fit very tightly pressed up to the sides of the mold. Then gently push and press the ends to meet together to make a seamless cake. The cake is very flexible so you can push it into place. You can use more than one piece to “wrap “your mold, if one cut piece is not long enough.


5.The mold is done, and ready to fill.

*Note: If not ready to use. Lay cake kept whole or already cut into strips, on a flat surface, wrap in parchment and several layers of cling wrap and freeze.


Entrement- Filling Options:
It is nice to have a completed dessert so you can unmold and see the Joconde working. Fill with anything you desire. Layers of different flavors and textures! However, it needs to be something cold that will not fall apart when unmolded.
Suggestions:

Mousses, pastry creams, Bavarian creams, cheesecakes, puddings, curds, jams, cookie bases, more cake (bake off the remaining sponge and cut to layer inside), nuts, Dacquoise, fresh fruit, chocolates, gelee.

Espresso Syrup 
Courtesy of Martha Stewart
Makes about 2/3 cup
1/2 cup freshly brewed strong espresso
1/4 cup sugar
1/4 cup water
Bring espresso, sugar, and water to a boil in a saucepan, stirring to dissolve sugar. Let cool. Syrup can be refrigerated in an airtight container for up to 2 weeks.

Milk Chocolate Ganache
Courtesy of Martha Stewart


Makes about 2 cups
8 ounces good-quality milk chocolate, finely chopped
1cup heavy cream

1.Put chocolate into a heatproof bowl. Bring cream to a simmer in a saucepan. Pour over chocolate. Let stand for 10 minutes, then whisk until smooth. Let cool, whisking occasionally. For piping, immediately transfer to pastry bag fitted with a 1/4-inch plain round tip (such as Ateco #802). Use immediately.

Bittersweet Chocolate Mousse
6 ounces of good quality bittersweet chocolate-finely chopped
6 Egg yolks
3/4 cup Sugar
1/3 cup Grand Marnier liqueur
1 1/4 cup Chilled whipping cream

Stir the chocolate in double boiler over barely simmering water until smooth and melted. Cool to lukewarm. using electric mixer, beat yolks to blend in mixing  bowl. Gradually add sugar and beat until pale yellow and slowly dissolving ribbon forms when beaters are lifted. Blend in Grand Marnier, then melted chocolate. Whip cream in another bowl until soft peaks form. Fold 1/3 of cream into chocolate mixture. Gently fold in remaining cream. Pour mixture into the entremet,  smoothing  top. Freeze until set, about 30 minutes.

Shiny Chocolate Glaze
Courtesy of Martha Stewart
Makes about 1 1/4 cups
6 ounces good-quality bittersweet chocolate, finely chopped
1/3 cup sugar
1/2 cup freshly brewed coffee
2 tablespoons light corn syrup
1 teaspoon coarse salt
2 tablespoons unsalted butter

1.Bring chocolate, sugar, coffee, corn syrup, and salt to a boil in a saucepan, stirring to melt chocolate. Reduce heat, and simmer, stirring occasionally, until thickened, about 5 minutes. Remove from heat, and stir in butter. Let cool, stirring occasionally, until barely warm but still pourable, about 20 minutes. Use immediately.
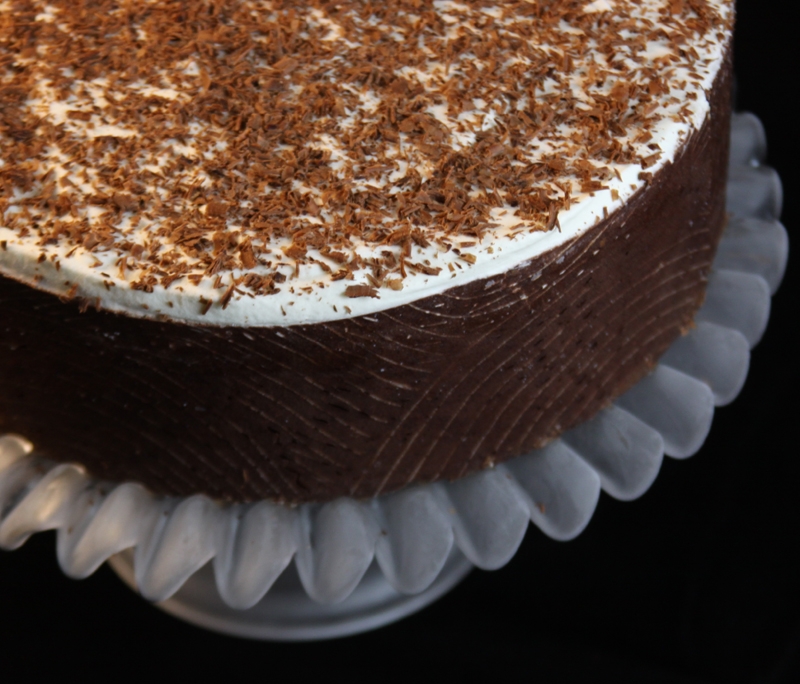
Optional topping: 2 cups of whipped cream , whipped to soft peaks . Spread onto of the chilled entremet and then  shave some dark chocolate over the whipped cream topping.


 Assembly:
1.Follow Astheroshe's directions for filling the mold, including using the leftover joconde scraps to line the bottom of the mold.
2.Take the espresso syrup and dab it onto the sides and bottom of the joconde
3.Pour about 1/2 inch of the milk chocolate ganache into the bottom of the mold.
4.Freeze until the ganache is firm-about 30-45 minutes
5.Add the Grand Marnier Mousse
6.Freeze until the mousse is firm about 45 minutes- 1 hour
7.Top with the shiny chocolate glaze and place back in freezer for about 20 minutes.
8.Carefully remove the spring form mold-you may have to quickly heat the outside of the ring with a hair dryer-do this briefly and quickly so that you don't melt your beautiful creation.
9. If you made the optional whipped cream topping, spread that over the top now leveling it out with a spatula then shave some dark chocolate over that.
And voila your deletable Bittersweet Chocolate Grand Marnier Entremet. Bon Appetit.


Saturday, December 25, 2010

Christmas Stollen-Daring Bakers December Challenge


The 2010 December Daring Bakers’ challenge was hosted by Penny of Sweet Sadie’s Baking. She chose to challenge Daring Bakers’ to make Stollen. She adapted a friend’s family recipe and combined it with information from friends, techniques from Peter Reinhart’s book.........and Martha Stewart’s demonstration.


A Stollen is a  cake containing dried fruit, and covered with sugar, powdered sugar or icing sugar. The cake is usually made with chopped candied fruit and/or dried fruit, nuts and spices. Stollen is a traditional German cake, usually eaten during the Christmas season.  Panettone , an Italian bread is similar to Stollen.  I used lemon peel, orange peel,almonds and dried sour cherries in mine along with the raisins soaked in rum.  This is another recipe you cannot throw together in the morning.  The dough needs time to rise and rest and rise and rest.  I started my recipe the morning of December 22nd and was taking it out of the oven the evening of December 23rd. It was well worth the effort. Once it was cut it disappeared quickly.  I'm glad I added the sour cherries,it just added another taste dimension to it.  I can imagine that if I had kept it for a few more days the flavors in it would have developed even more-but I couldn't stop myself from cutting into it. And after all I did make it for Christmas Eve dinner.  We finished off the last piece after dinner on Christmas Day.  Hmm, might have to put together another one.  I hope you enjoyed your holidays with your loved ones. And thanks to Penny at Sweet Sadie's Baking for this challenge.


Wednesday, October 27, 2010

Bomboloni with Cherry Preserves-Daring Bakers October Challenge


The October 2010 Daring Bakers challenge was hosted by Lori of Butter Me Up. Lori chose to challenge DBers to make doughnuts. She used several sources for her recipes including Alton Brown, Nancy Silverton, Kate Neumann and Epicurious.

I missed last month's challenge with the decorated sugar cookies and I was determined not to miss this month's challenge. When I saw it was doughnuts I was ecstatic. Simple sweet sugary doughnuts-breakfast of champions. Well maybe not, but surely we all have a favorite doughnut. I grew up back East in a small steel town along the river-Duquesne. We didn't have a local doughnut maker but Dunkin Doughnuts was within driving distance. And the site of that bag would bring chills to a 10 year old. My favorite were the custard filled chocolate topped ones and the simple powder sugared ones. It wasn't until we moved out West that I realized doughnuts were a big deal. Just mention the word  doughnut in Seattle and you have your doughnut camps forming-Top Pot with their hand forged doughnuts; Mighty-O with vegan and organic doughnuts;Krispy Kreme with their light as air morsels; Daily Dozen Doughnuts in the Pike Place Market-hot off the conveyor belt and a favorite of market goers and last but not least Tom Douglas's Dahlia Bakery-fried doughnuts with marscapone and jam-need I say more?


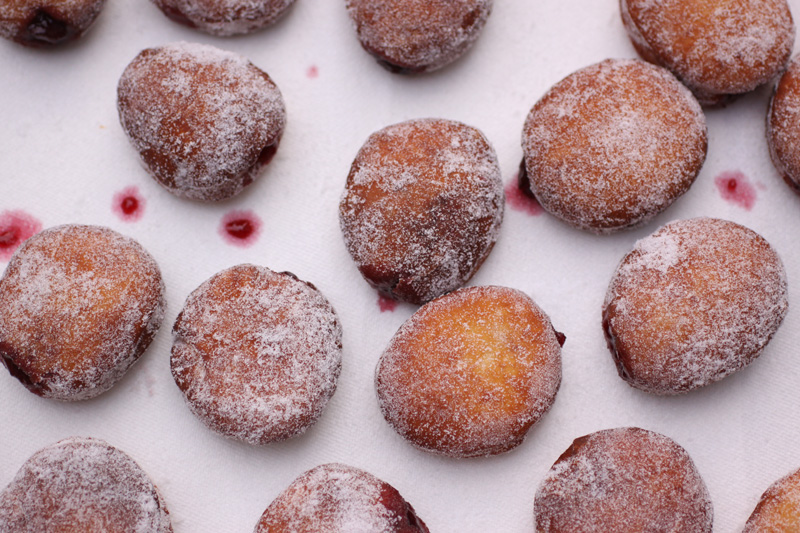
For this challenge I chose to make the Bomboloni with Kate Neuman's recipe . Not only did they sound scrumptious , I just love saying Bomboloni ! I used Bonne Mamam Sweet Cherry Preserves-the tartness of the preserves complimented the sweetness of the dough.

These disappeared immediately ! They were so tasty and warm just after removing them from the fryer. I couldn't wait to fill them with the Cherry preserves . And they were even better with the filling. This is a keeper recipe. I'm getting ready to make apple butter and I think these rolled in cinnamon sugar with apple butter filling would be incredible.


Tuesday, July 27, 2010

July Daring Bakers Challenge -Swiss Ice Cream Roll


The July 2010 Daring Bakers’ challenge was hosted by Sunita of Sunita’s world – life and food. Sunita challenged everyone to make an ice-cream filled Swiss roll that’s then used to make a bombe with hot fudge. Her recipe is based on an ice cream cake recipe from Taste of Home. Instructions and PDF file can be found  here.


My inspiration for my Swiss Roll came to me while I was in my garden gathering basil. I love the odor that's released when you even brush against basil. I remembered a dessert I had at Ray's Boathouse that was a strawberry cake,with whipped cream,chocolate ganache and a sweet basil sauce. I loved how those flavors came together so I decided to try and combine them for this challenge. First of all if you do nothing else make the Basil Ice Cream ! Oh my goodness it is indescribable-one of those can't stop eating kind of desserts-don't say I didn't warn you. And the balsamic strawberry ice cream-the flavors combined with the basil make you think you are eating your strawberries fresh out of the garden! Thank you Sunita for coming up with this challenge because I learned so much and I don't think this is something I would have done on my own !


Roulade or Swiss Roll
Adapted from Cook's Illustrated

Ingredients
1/4 cup unbleached all-purpose flour (about 1 1/4 ounces), plus more for dusting baking sheet
6 ounces bittersweet chocolate or semisweet chocolate, chopped fine
2 tablespoons cold unsalted butter , cut into two pieces
2 tablespoons cold water
1/4 cup cocoa (3/4 ounce), Dutch-processed, sifted, plus more for unmolding and garnish
1/8 teaspoon table salt
6 large eggs , separated, room temperature
1/3 cup granulated sugar (2 1/3 ounces)
1 teaspoon vanilla extract
1/8 teaspoon cream of tartar

Preparation:
1. Adjust oven rack to upper-middle position and heat oven to 400 degrees. Spray 18 by 12-inch rimmed baking sheet with nonstick cooking spray, cover pan bottom with parchment paper and spray parchment with nonstick cooking spray; dust baking sheet with flour, tapping out excess.
2. Bring 2 inches of water to simmer in small saucepan over medium heat. Combine chocolate, butter, and water in small heatproof bowl and cover tightly with plastic wrap. Set bowl over pan, reduce heat to medium-low, and heat until butter is almost completely melted and chocolate pieces are glossy, have lost definition, and are fully melted around edges, about 15 minutes. (Do not stir or let water in saucepan come to boil.) Remove bowl from heat, unwrap, and stir until smooth and glossy. While chocolate is melting, sift cocoa, flour, and salt together into small bowl and set aside.

3. In bowl of standing mixer, beat egg yolks at medium-high speed until just combined, about 15 seconds. With mixer running, add half of sugar. Continue to beat, scraping down sides of bowl as necessary until yolks are pale yellow and mixture falls in thick ribbon when beaters are lifted, about 8 minutes. Add vanilla and beat to combine, scraping down bowl once, about 30 seconds. Turn mixture into medium bowl; wash mixer bowl and beaters and dry with kitchen towel.

4. In clean bowl with clean beaters, beat egg whites and cream of tartar at medium speed until foamy, about 30 seconds. With mixer running, add about 1 teaspoon of remaining sugar; continue beating until soft peaks form, about 40 seconds. Gradually add remaining sugar and beat until whites are glossy and supple and hold stiff peaks when whisk is lifted, about 1 minute longer. Do not over beat (if whites look dry and granular, they are over beaten). While whites are beating, stir chocolate mixture into yolks. With rubber spatula, stir quarter of whites into chocolate mixture to lighten it. Fold in remaining whites until almost no streaks remain. Sprinkle dry ingredients over egg and chocolate mixture and fold in quickly but gently.

5. Pour batter into prepared pan; using offset icing spatula and working quickly, smooth surface and spread batter into pan corners. Bake until center of cake springs back when touched with finger, 8 to 10 minutes, rotating pan halfway through baking time. Cool cake in pan on wire rack for 5 minutes.

6.While cake is cooling, lay clean kitchen towel over work surface and sift 1 tablespoon cocoa over towel; with your hands, rub cocoa into towel. Run paring knife around perimeter of baking sheet to loosen cake. Invert cake onto towel and peel off parchment.

7. For finished cake: Starting at a long side, roll cake and towel together into jelly roll shape Cool for 15 minutes, then unroll cake and towel. Using offset spatula, immediately spread whipped cream filling evenly over surface of cake, almost to edges. Re roll cake gently but snugly around filling. Chill in refrigerator until ready to start filling with the ice cream. Then slice approximately 20 pieces about 1- 1 1/2 inches wide .


Whipped cream filling
Ingredients
2C of whipping cream

1 vanilla pod, cut into small pieces of about ½ cm (or 1 tsp vanilla extract)
5 tbsp of caster sugar (or grind regular sugar in your food processor until it becomes very fine)

In a large bowl beat the ingredients until thick and spreadable.


The Basil Ice Cream is so incredibly indescribably delicious !

Vanilla-Basil Ice Cream with Chopped Valhrona Chocolate
Makes approximately eight 1/2-cup servings
Adapted from The Kitchn

Ingredients
6 egg yolks
1/2 cup turbinado sugar
1 pints heavy cream
1 cup skim milk
1 1/2 ounces fresh basil leaves, torn
2 tablespoon vanilla extract
3/4  cup finely chopped Valhrona chocolate nibs

Preparation1. Pour cream and milk into non-reactive sauce pan. Add basil. Put over medium to medium-high heat until cream is scalded. Remove from heat.

2.In two containers, separate yolks from whites (reserve whites for another use -- don't waste them). add sugar to yolks and whisk until they reach ribbon stage (about 6-8 minutes).

3.Using a small measuring cup (1/8 cup measure), carefully and slowly temper cream into yolks. Do not get any basil in the yolks. Keep tempering until about half the cream has been added. Strain cream into another bowl, add that cream back to sauce pot. Return the tempered yolks and cream to the sauce pot (it will be slightly frothy). Continue to stir over low-medium heat for about 5 minutes or until mixture starts to thicken. Remove from heat and transfer to another container. Allow to chill in refrigerator overnight.

4.Using your chosen method of churning ice cream, add the chilled ice cream base to tumbler and churn. About half way through churning, add the chocolate. Once ice cream is semi-solid, transfer to the storage container/s of your choice and freeze.


Hot Fudge Sauce

TOTAL TIME 10 minutes
Ingredients2 cups heavy cream
4 tablespoons unsalted butter
1/2 cup light brown sugar
3/4 cup granulated sugar
1/4 teaspoon fine sea salt
2 ounces bittersweet chocolate in small pieces
1 1/4 cups sifted high-fat Dutch-process cocoa like Valrhona, Pernigotti or Droste (sift, then measure)
1/2 teaspoon vanilla extract

Preparation
1. In medium saucepan, combine cream, butter, sugars and salt. Bring to a simmer over medium-low heat. Simmer 45 seconds. Add chocolate, and whisk to dissolve. Remove from heat, add cocoa, and whisk until no lumps remain.

2. Return pan to low heat, and simmer sauce until glossy, whisking constantly, 20 seconds. Remove from heat, and stir in vanilla. Once it's cooled follow instructions for assembly.


Roasted Strawberry Balsamic Ice Cream
Thanks to Closet Cooking !
(makes 4 servings)
Ingredients:
2 cups strawberries (cleaned and hulled)
2 tablespoons balsamic vinegar
2 tablespoons sugar
1 cup heavy cream
1 cup full milk
1/2 cup sugar (I used vanilla sugar)
3 egg yolks

Preparation
1. Toss the strawberries in the balsamic vinegar and sugar and let sit for 20 minutes.
2. Pour the mixture on a baking pan covered in foil folded up on the sides to capture the juices.
3. Roast the strawberries in a preheated 425F oven until they start to caramelize, about 15-20 minutes.
4. Place the strawberries and the juices into a container and chill in the fridge.
5. Heat the cream, milk and sugar in a sauce pan until it almost boils, about 5 minutes.
6. Reduce the heat to low.
7. Add one tablespoon of the cream mixture to the eggs to temper them.
8. Add the egg mixture to the sauce pan.
9. Cook at low heat until it thickens and can coat the back of a spoon.
10. You may want to strain the mixture at this point to remove any bits that may have formed while cooking.
11. Chill the mixture in the fridge.
12. Mix the cream and strawberry mixtures.
13. Freeze according to the instructions for your ice cream machine.


Assembly

1.Open the roll and spread the whipped cream mixture, making sure it does not go right to the edges (a border of ½ an inch should be fine).
2.Roll the cake up again, this time without the towel. Wrap in plastic wrap and chill in the fridge till needed, seam side down.
3.Remove the Swiss Roll from the refrigerator and cut the Swiss roll  into 20 equal slices ( approximately 2 cms each ).
4.Cover the bottom and sides of the bowl in which you are going to set the dessert with cling film/plastic wrap.
5.Arrange two slices at the bottom of the pan, with their seam sides facing each other. Arrange the Swiss roll slices up the bowl, with the seam sides facing away from the bottom, to cover the sides of the bowl. Cover the bowl with plastic wrap and freeze till the slices are firm (at least 30 minutes).
6.Soften the basil vanilla ice cream. Take the bowl out of the freezer, remove the cling film cover and add the ice cream on top of the cake slices. Spread it out to cover the bottom and sides of the bowl. Cover the bowl with plastic wrap and freeze till firm ( at least 1 hour)
7.Add the cooled fudge sauce over the basil vanilla ice cream, cover and freeze till firm
8.Soften the balsamic strawberry ice cream and spread it over the fudge sauce. Cover with plastic wrap and freeze for at least 4-5 hours till completely set .
9.Remove the plastic cover, and place the serving plate on top of the bowl. Turn it upside down and remove the bowl and the plastic lining. If the bowl does not come away easily, wipe the outsides of the bowl with a kitchen towel dampened with hot water. The bowl will come away easily


NOW YOU KNOW WHY WE ARE CALLED DARING BAKERS !

Sunday, June 27, 2010

June 2010 Daring Bakers' Challenge


The June 2010 Daring Bakers’ challenge was hosted by Dawn of Doable and Delicious. Dawn challenged the Daring Bakers’ to make Chocolate Pavlovas and Chocolate Mascarpone Mousse. The challenge recipe is based on a recipe from the book Chocolate Epiphany by Francois Payard

Here is the link for the printable PDF file

The beginnings of my meringue

Recipe 1: Chocolate Meringue (for the chocolate Pavlova):

3 large egg whites
½ cup plus 1 tbsp (110 grams) white granulated sugar
¼ cup (30 grams) confectioner’s (icing) sugar
1/3 cup (30 grams) cocoa powder

Directions:
1.Place a rack in the center of the oven and preheat to 200º F (95º C) degrees. Line two baking sheets with silpat or parchment and set aside.
2.Put the egg whites in a bowl and whip until soft peaks form. Increase speed to high and gradually add granulated sugar about 1 tbsp at a time until stiff peaks form. (The whites should be firm but moist.)
3.Sift the confectioner’s sugar and cocoa powder over the egg whites and fold the dry ingredients into the white. (This looks like it will not happen. Fold gently and it will eventually come together.)
4.Fill a pastry bag with the meringue. Pipe the meringue into whatever shapes you desire. Alternatively, you could just free form your shapes and level them a bit with the back of a spoon. (Class made rounds, hearts, diamonds and an attempt at a clover was made!)
5.Bake for 2-3 hours until the meringues become dry and crisp. Cool and store in an airtight container for up to 3 days.
Folding the chocolate into the meringue

Recipe 2: Chocolate Mascarpone Mousse (for the top of the Pavlova base):
1 ½ cups (355 mls) heavy cream (cream with a milk fat content of between 36 and 40 percent)
grated zest of 1 average sized lemon
9 ounces (255 grams) 72% chocolate, chopped
1 2/3 cups (390 mls) mascarpone (see the recipe below for home made mascarpone)
pinch of nutmeg
2 tbsp (30 mls) Grand Marnier (or orange juice)

Directions:
1.Put ½ cup (120 mls) of the heavy cream and the lemon zest in a saucepan over medium high heat. Once warm, add the chocolate and whisk until melted and smooth. Transfer the mixture to a bowl and let sit at room temperature until cool.
2.Place the mascarpone, the remaining cup of cream and nutmeg in a bowl. Whip on low for a minute until the mascarpone is loose. Add the Grand Marnier and whip on medium speed until it holds soft peaks. (DO NOT OVERBEAT AS THE MASCARPONE WILL BREAK.)
3.Mix about ¼ of the mascarpone mixture into the chocolate to lighten. Fold in the remaining mascarpone until well incorporated. Fill a pastry bag with the mousse. Again, you could just free form mousse on top of the pavlova.

Beginnings of my Pavlovas

Recipe 3: Mascarpone Cream (for drizzling):
1 recipe crème anglaise
½ cup (120 mls) mascarpone
2 tbsp (30 mls) Sambucca (optional)
½ cup (120 mls) heavy cream

Directions:
1.Prepare the crème anglaise. Slowly whisk in the mascarpone and the Sambucca and let the mixture cool. Put the cream in a bowl and beat with electric mixer until very soft peaks are formed. Fold the cream into the mascarpone mixture.


Recipe 4: Crème Anglaise (a component of the Mascarpone Cream above):
1 cup (235 mls) whole milk
1 cup (235 mls) heavy cream
1 vanilla bean, split or 1 tsp pure vanilla extract
6 large egg yolks
6 tbsp (75 grams) sugar

Directions:
1.In a bowl, whisk together the egg yolks and sugar until the mixture turns pale yellow.
2.Combine the milk, cream and vanilla in a saucepan over medium high heat, bringing the mixture to a boil. Take off the heat.
3.Pour about ½ cup of the hot liquid into the yolk mixture, whisking constantly to keep from making scrambled eggs. Pour the yolk mixture into the pan with the remaining cream mixture and put the heat back on medium. Stir constantly with a wooden spoon until the mixture thickens enough to lightly coat the back of a wooden spoon. DO NOT OVERCOOK.
4.Remove the mixture from the heat and strain it through a fine mesh sieve into a bowl. Cover and refrigerate until the mixture is thoroughly chilled, about 2 hours or overnight.

I made these the diameter of a medium muffin

Homemade Mascarpone courtesy of Vera at Baking Obession
Much easier to make than it might seem, homemade mascarpone is a tastier and less expensive alternative to a store-bought cheese. It’s marvelous with ripe summer berries, finally appeared at our farmer’s markets.


Makes about 12 oz
Ingredients:
•500 ml whipping (36 %) pasteurized (not ultra-pasteurized), preferably organic cream
•1 tbsp fresh lemon juice

Preparation:
Bring 1 inch of water to a boil in a wide skillet. Reduce the heat to medium-low so the water is barely simmering. Pour the cream into a medium heat-resistant bowl, then place the bowl into the skillet. Heat the cream, stirring often, to 190 F. It will take about 15 minutes of delicate heating. Add the lemon juice and continue heating the mixture, stirring gently, until the cream curdles. Do not expect the same action as you see during ricotta cheese making. All that the whipping cream will do is become thicker, like a well-done crème anglaise. It will cover a back of your wooden spoon thickly. You will see just a few clear whey streaks when you stir. Remove the bowl from the water and let cool for about 20 minutes. Meanwhile, line a sieve with four layers of dampened cheesecloth and set it over a bowl. Transfer the mixture into the lined sieve. Do not squeeze the cheese in the cheesecloth or press on its surface (be patient, it will firm up after refrigeration time). Once cooled completely, cover with plastic wrap and refrigerate (in the sieve) overnight or up to 24 hours. And according to Vera it will firm up beautifully in the fridge-don't worry about the custard like texture when you place it in the fridge.

Assembly:
Pipe the mousse onto the pavlovas and drizzle with the mascarpone cream over the top. Dust with confectioner’s sugar and fresh fruit if desired.

Additional Information:
Wikipedia’s definition of Pavlova
The history of Pavlova
Videos:
Great video from Epicurious

http://www.doableanddelicious.com/


Thursday, May 27, 2010

Daring Baker's Challenge - Croquembouche

The May 2010 Daring Bakers’ challenge was hosted by Cat of Little Miss Cupcake. Cat challenged everyone to make a piece montée, or croquembouche, based on recipes from Peter Kump’s Baking School in Manhattan and Nick Malgieri.
It's amazing what a little over confidence can do to you-I love pate a choux-and I thought I was pretty good at making eclairs, swans and cream puffs using the choux.  So when I saw this month's Daring Bakers' Challenge-I thought great no problem ,piece of cake.  Ha-the choux was the least of my worries-it was the building of the piece montee that was my downfall!  You see Seattle and caramel glaze do not a marriage make-especially during Spring rain showers.  I was so proud of my little piece montee and couldn't wait to get up at the crack of dawn to photograph it-figuring I would have some great early morning light.  Well imagine my surprise when I came around the bend into the kitchen and saw caramel glaze dripping off the cake stand and sad little puffs that had rolled off the piece montee onto  the counter top and floor.  So back to the drawing board.
Fortunately the Vanilla Creme Patissiere and the Pate a Choux are not complicated and the recipes provided by Cat were excellent.  My cream puffs have never been more airy or tastier !  The 2nd time around I knew not to even attempt the caramel glaze and decided on chocolate ganache.  But I didn't want a giant cream puff tower covered in chocolate so I decided to add some Belgian Sugar Pearls to half the batch of choux just before baking.  I applied the sugar just after the egg wash.  They turned out so pretty and had a nice  crunch from the sugar-the next time I make cream puffs I'm going to make the entire batch with the sugar-very tasty.


Voila-Success


Quel Horrible ! And the pretty spun sugar -all gone


Vanilla Creme Patissiere


For the Vanilla Crème Patissiere (Half Batch)
1 cup (225 ml.) whole milk
2 Tbsp. cornstarch
6 Tbsp. (100 g.) sugar
1 large egg
2 large egg yolks
2 Tbsp. (30 g.) unsalted butter
1 Tsp. Vanilla

Dissolve cornstarch in ¼ cup of milk. Combine the remaining milk with the sugar in a saucepan; bring to boil; remove from heat.
Beat the whole egg, then the yolks into the cornstarch mixture. Pour 1/3 of boiling milk into the egg mixture, whisking constantly so that the eggs do not begin to cook.
Return the remaining milk to boil. Pour in the hot egg mixture in a stream, continuing whisking.
Continue whisking (this is important – you do not want the eggs to solidify/cook) until the cream thickens and comes to a boil. Remove from heat and beat in the butter and vanilla.


Cooling the Pate a Choux

Pate a Choux (Yield: About 28)
¾ cup (175 ml.) water
6 Tbsp. (85 g.) unsalted butter
¼ Tsp. salt
1 Tbsp. sugar
1 cup (125 g.) all-purpose flour
4 large eggs
For Egg Wash: 1 egg and pinch of salt
Pre-heat oven to 425◦F/220◦C degrees. Line two baking sheets with parchment paper.
Preparing batter:
Combine water, butter, salt and sugar in a saucepan over medium heat. Bring to a boil and stir occasionally. At boil, remove from heat and sift in the flour, stirring to combine completely.
Return to heat and cook, stirring constantly until the batter dries slightly and begins to pull away from the sides of the pan.
Transfer to a bowl and stir with a wooden spoon 1 minute to cool slightly.
Add 1 egg. The batter will appear loose and shiny. As you stir, the batter will become dry-looking like lightly buttered mashed potatoes.It is at this point that you will add in the next egg. Repeat until you have incorporated all the eggs.


Pate a Choux ready to pipe
Piping:
Transfer batter to a pastry bag fitted with a large open tip (I piped directly from the bag opening without a tip). Pipe choux about 1 inch-part in the baking sheets. Choux should be about 1 inch high about 1 inch wide.
Using a clean finger dipped in hot water, gently press down on any tips that have formed on the top of choux when piping. You want them to retain their ball shape, but be smoothly curved on top.Brush tops with egg wash (1 egg lightly beaten with pinch of salt).


My little choux


Baking:
Bake the choux at 425◦F/220◦C degrees until well-puffed and turning lightly golden in color, about 10 minutes.
Lower the temperature to 350◦F/180◦C degrees and continue baking until well-colored and dry, about 20 minutes more. Remove to a rack and cool. Can be stored in a airtight box overnight.


So pretty and brown and so light

Filling:
When you are ready to assemble your piece montée, using a plain pastry tip, pierce the bottom of each choux. Fill the choux with pastry cream using either the same tip or a star tip, and place on a paper-lined sheet. Choux can be refrigerated briefly at this point while you make your glaze.


Love the Belgian Sugar


Sometime this summer, when it is dry I will try them again with the caramel glaze !


Chocolate Ganache
1 1/2 cups heavy cream
12 oz good quality chocolate-finely chopped


Bring the cream to a boil over medium heat.  Take the boiling cream and pour it over the finely chopped chocolate.  Gently shake the bowl so that all of the chocolate is covered by the cream.  Let it sit for 2 minutes then gently whisk until the chocolate is melted.  

Here is the rest of the instructions if you are brave enough to try the caramel glaze .

Use one of these to top your choux and assemble your piece montée.
Chocolate Glaze:
8 ounces/200 g. finely chopped chocolate (use the finest quality you can afford as the taste will be quite pronounced; I recommend semi-sweet)
Melt chocolate in microwave or double boiler. Stir at regular intervals to avoid burning. Use the best quality chocolate you can afford. Use immediately.
Hard Caramel Glaze:
1 cup (225 g.) sugar
½ teaspoon lemon juice
Combine sugar and lemon juice in a saucepan with a metal kitchen spoon stirring until the sugar resembles wet sand. Place on medium heat; heat without stirring until sugar starts to melt around the sides of the pan and the center begins to smoke. Begin to stir sugar. Continue heating, stirring occasionally until the sugar is a clear, amber color. Remove from heat immediately; place bottom of pan in ice water to stop the cooking. Use immediately.
Assembly of your Piece Montée:
You may want to lay out your unfilled, unglazed choux in a practice design to get a feel for how to assemble the final dessert. For example, if making a conical shape, trace a circle (no bigger than 8 inches) on a piece of parchment to use as a pattern. Then take some of the larger choux and assemble them in the circle for the bottom layer. Practice seeing which pieces fit together best.
Once you are ready to assemble your piece montée, dip the top of each choux in your glaze (careful it may be still hot!), and start assembling on your cake board/plate/sheet. Continue dipping and adding choux in levels using the glaze to hold them together as you build up. (You may want to use toothpicks to hold them in place – see video #4 below).
When you have finished the design of your piece montée, you may drizzle with remaining glaze or use ribbons, sugar cookie cut-outs, almonds, flowers, etc. to decorate. Have fun and enjoy! Bon appétit!
Additional Information: Here are some videos you may want to take a look at before you get started on your piece montée.
1) Martha Stewart Assembles a Croquembouche:
http://www.marthastewart.com/recipe/marthas-famous-croquembouche
2) Assembling croquembouche using the interior of a cylinder:
http://www.youtube.com/watch?v=Fq-UgMxe0Y4
3) Asembling Free-standing Croquembouche with Chocolate Glaze:
http://www.youtube.com/watch?v=ZrIanD5pi9E&feature=related
4) Assembling a Croquembouche with Toothpicks and Cone:
http://www.youtube.com/watch?v=vIGaidsM-NI&feature=related
See this google images search of Croquembouche for inspiration:
http://images.google.com/images?hl=en&source=hp&q=croquembouche&btnG=Search+Images&gbv=2&aq=f&aqi=&aql=&oq=&gs_rfai=
Here’s a link to a dairy-free pate a choux and crème patisserie recipe:
http://dairyfreecooking.about.com/od/dessertsbeverages/r/creampuffs.htm