Friday, March 15, 2013

Abracadabra Magic Custard Cake


Have you seen this cake on Pinterest yet ?  I don't know how you could miss it-everyone has been pinning it for days.  When I first spotted it I immediately went to the blog :White on Rice Couple, since they had just posted it.  I love everything that Diane and Todd do on their blog.  I probably have more of their recipes bookmarked and saved than anyone else's on the web.  And their pictures of this cake are absolutely gorgeous.  So of course I had to try it out.  The recipe is fairly simple. And after coming off my marathon Cubano Croissant recipe I needed something simple and sweet.  If you don't like custard I wouldn't recommend this cake-it is after all a custard cake !   I took Diane & Todd's advice to beat the egg whites in a copper bowl, but if you don't have a copper mixing bowl just add the vinegar to the egg whites as called for in the recipe.


This cake goes into the oven in an 8 x 8 pan almost filled to capacity-I thought it was a little too thin of a cake batter,but oh boy was I wrong.  When it was finished baking it had souffled higher than the pan edges.  By the time I got my camera the cake had sank a little.  I checked Diane & Todd's pictures and I wasn't worried.  This cake looks so unassuming coming out of the oven-don't let that fool you.


The smell of the vanilla custard was hard to resist and before it had a chance to properly cool, I was cutting a little tiny piece out of the corner to test it. Holy Custard Cake Batman-this is indescribably delicious.  Addictive, not too sweet with the puffy top cake layer, the creamy firm custard layer and a very thin bottom cake layer. Swoon.  When you make this,here is a winning bet for you; bet the other person that they just can't eat one piece-you will win-trust me.  I had to quickly wrap up little packages of this deliciousness for my neighbors.  Otherwise it would have been about 3 hours on the treadmill for me.


This recipe is definitely a keeper. I can't wait to try it out when we are camping and see how it bakes up in Ruby our camper van.  I know one thing, sharing this around the campground will result in friends for life.

Yummy custard


  Go ahead, try it, so very good with a hot cup of espresso. Head over to Diane & Todd's blog for the recipe : White on Rice Couple.   Bon Appetit !

A party without cake is really just a meeting"-Julia Child

Wednesday, March 6, 2013

Cubano Croissants ala Christina Tosi


I was casually reading the HuffPost Taste section Friday morning when the title "Christina Tosi's Cubano Croissant" caught my eye.  I am absolutely crazy about Cubano sandwiches and when I saw the chance of making it as a croissant-well my little heart skipped a beat !  Add to the fact that it was a recipe from Christina Tosi,  the 2012 James Beard Rising Star Chef- it couldn't get any better. Christina is the founding chef of Momofuku Milk Bar and if you haven't made her crazy delicious Crack Pie  yet, you should.


Warning-this is a very time consuming but "simple" recipe. Simple meaning basic cooking and baking methods-nothing fancy required. Time consuming yes - 15-20 minutes to make the dry rub; 6-12 hours to roast the pork shoulder; 20-30 minutes to make the mojo marinade; 30 minutes to make the relish butter;a minimum of 3 hours to make the croissant dough;and about 1 hour to fill and bake the croissants !  Would I do it again ?  Not next week, but yes I will make these again-they are freaking incredible.  You can't believe the taste.  A buttery,flaky croissant dotted with dill relish,a schmear of yellow mustard, then filled with ham,Swiss cheese and the mojo marinated pulled pork. We ate these for dinner Monday night and all we could do while eating was make those mm mm sounds between bites.  I lost count of how many times J said this was the best sandwich he ever had.  I second that !


I started this recipe on Saturday-cooked the pork for about 9 hours.  On Sunday I made the relish butter and on Monday morning I made the croissant dough.  By Monday afternoon I was ready to roll these little beauties and pop them in the oven.  The recipe stated that they should be baked for 2-25 minutes at 375degrees.  My oven has been calibrated so I know it's accurate-my baking time was more like 45 minutes until they got that beautiful caramelized brown color. (I've listed a few other changes I made to the recipe below).  I could barely wait for them to cool down before that first test bite.  OMG , that is all I can say.  The recipe appears at the end of the You Tube Video.  Christina Tosi uses her "mother dough recipe" for the croissants and if you have her Milk Bar Cookbook you can find the recipe there.  Otherwise,use your favorite croissant recipe.  My policy is not to list a recipe unless it's on the Internet already and the Mother Dough isn't. You might be able to find it here.  Buy the book,it's filled with wonderful scrumptious recipes !


I made a few changes to the recipe:
  1.  I used dill relish in the relish butter and a combination 1/2 dill relish and 1/2 of sweet relish in the marinade.
  2. I added Swiss cheese to my layers when putting the croissant together-one below the pork filling and one on top of the pork filling-I've always had my Cubano's with cheese.
  3. And the next time I will use my slow cooker to make the pork-the oven dried it out too much-I should have trusted my instincts.  When I put it in the oven a little voice said use the slow cooker but I ignored it. 
  4. I chopped the pork mixture into smaller pieces-made it more manageable to form into the little mounds before rolling the croissants.
  5. I quadrupled the ingredients for the marinade-the amount the original recipe called for barely gave a tiny hint of taste to the 6 lb pork shoulder I made.
  6. I used a full recipe for the "mother dough"-that gave me enough dough for 12 nice sized croissants and I still had lots of pork left over (very good as Cubano sliders on those Hawaiian buns !)
Happiness does not come from doing easy work
but from the afterglow of satisfaction
that comes after the achievement of a difficult task
that demanded our best.
-Theodore Isaac Rubin


Honestly, I will definitely make these again- and there was a huge amount of satisfaction when I completed these !


Wednesday, February 27, 2013

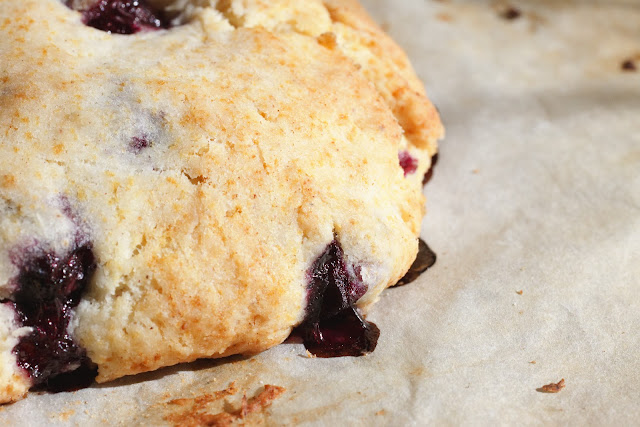
Blueberry Cream Biscuits with Blueberry Sauce


Last week I was sitting in my dentist's office waiting for my name to be called.  I hate the dentist. It took me forever to get up the nerve  to make my appointment.  I take care of myself so I thought I was going to skate by. Unfortunately that was not the plan my teeth had for me. Two crowns-one upper and one lower-did I tell you I hate the dentist ?  My dentist is a very sweet and a nice guy-I don't hate him-just the process.  So while I was waiting, with high anxiety, I tried to distract myself with the usual waiting room reading material. I started flipping through the pages of Better Homes and Gardens, whoa..what is that-blueberries ?  I wanted to run home and try the recipe immediately.  Of course it had nothing to do with the fact that I was looking for any reason to run out of the dentist's office.  Too bad, they called my name, and for the next  2 hours I endured the drilling and water squirts down my throat.  I'm not afraid of drills, I just don't like having tools and hands in my mouth.  I start to get very anxious and have to remind myself to breath.  I don't do laughing gas, it just makes me more anxious and doesn't make me laugh !  So I sat there thinking about these biscuits in order to distract myself. The recipe seemed far too simple.


Two hours later and finally out of the dentist's chair I was finished.  Thanking my dentist and his assistant for the torture they inflicted on me-why ?  I mean really, thank you for making me sit with my mouth opened for 2 hours while you drilled and scraped and suctioned out my mouth ? Needless to say I just about ran out of the office.  On the way home I did manage, (in spite of the swollen tongue and mouth), to stop for fresh blueberries and whipping cream .  As soon as I got home I suddenly felt very tired.  Stress will do that and dental work is at the top of my stressors.  So instead of baking I took a nap.  These could wait one more day.


The next morning I looked over the recipe and about 45 minutes later I was pulling these babies from the oven.  This really  is  a super simple recipe and oh so good.  Another one to add to my "go to recipes ".  Even the blueberry sauce was easy peasy !  You should make these.  Run out to the grocery store right now and get your blueberries and any other ingredients you might need.  And if you go to the Better Homes and Gardens site and read the review saying that these were horrible,too sticky, only the tops baked, etc. etc., ignore it.  It couldn't be further from the truth.


Now please don't let my dentist know that 48 hours after he finished I was eating teeth staining blueberry biscuits with blueberry sauce.  Just kidding ! No stains , nothing but sweet deliciousness-enjoy !


Blueberry Cream Biscuits with Blueberry Sauce
Yield: 12 biscuits

Ingredients:
2 cups all-purpose flour
2 teaspoons baking powder
2 tablespoons sugar
1/2 teaspoon salt
1/4 teaspoon grated nutmeg
1 cup blueberries
1 1/2 cups whipping cream

Preheat oven to 425 degrees F.  In a large bowl thoroughly mix flour, baking powder, sugar, salt, and nutmeg. Toss blueberries with the flour mixture. Stir whipping cream into the flour mixture until just moistened.
Turn out dough on a floured work surface.( In order to not overwork or over flour the dough , I turned it out onto my parchment lined baking sheet. Didn't have to worry about it sticking, just gently formed it into the 7 inch square. And I used the edges of the parchment paper to help gently lift and fold the dough)  Gently lift and fold dough four or five, making a quarter turn between each fold. Place dough on a parchment-lined baking sheet. Form dough in a 7- to 8-inch square, approximately 1 inch thick. Using a floured pizza cutter or knife, cut 12 to 16 squares in dough, leaving biscuits intact. Bake in upper half of oven for 17 to 20 minutes or until golden brown. Cut through or pull apart biscuits. Serve warm with Blueberry Sauce.


Blueberry Sauce:
    2 cups blueberries
    1/3 cup sugar
    2 tablespoons water
    1 teaspoon vanilla 

In a medium saucepan combine 1 cup of the blueberries, the sugar, and water. Bring to simmering; cook and stir until blueberries pop and sauce has thickened. Remove from heat, then stir in the vanilla and remaining blueberries. Serve warm or at room temperature.


Saturday, February 23, 2013

Creme Brulee Eclairs Set on Fire


I was in the grocery line on Valentines Day doing some last minute shopping for our camping trip .  We would be celebrating Valentines Day over the long President's Day weekend.  The grocery clerk was making small talk and asked what plans I had.  Of course I was bubbling over with enthusiasm about the upcoming trip and told her we were going to a new campground on the Washington Coast that we had never been to before.  When I told her the name -Cape Disappointment-her mouth dropped and she said: "Oh" with a sad frown face. Then she added that it didn't sound like a very good place to be celebrating.  Isn't it funny how we allow people to interfere with our happiness ?  As I walked out of the store I realized I had allowed her to steal my joy. By the time I got the groceries loaded into the car I realized how silly I was.  Shame,shame,shame on me for allowing her to be a black cloud over my happiness.

Cape Disappointment ? No! More like "Cape could never be disappointed" because it's so beautiful .

 Cape Disappointment or Cape Happiness,the name didn't matter-it's what you make of it and we always try to make the very best of it.  So smile back on my face,to do list in hand and groceries packed in Ruby.  Now to decide what special dessert to make for our camping celebration.  I had to think about what would keep well and still look pretty and very special when it came time to eat. Cupcakes?  Mmm,a little too mundane for this trip. Cake? Too much for just the two of us. Pie? Nahh,wasn't in the mood for rolling dough.  Doughnuts? Doughnuts are always a good idea but best eaten fresh out of the frying pan and I wasn't plan on heating up a pan of oil inside Ruby our camper. Eclairs ?  Yes I know the last post I did was on eclairs-but they are so lovely and so special.  And they keep very well.  Now what could I do to make them even more special.  I started thinking about flavor combinations and after looking at a zillion eclair images on Google I thought -Creme Brulee ?  Why not,it's a pastry cream filling and I could torch the sugar at the campsite with little or no effort. And what a fabulous surprise it would be-sitting on the beach eating Creme Brulee eclairs to celebrate our good fortune and our being together !


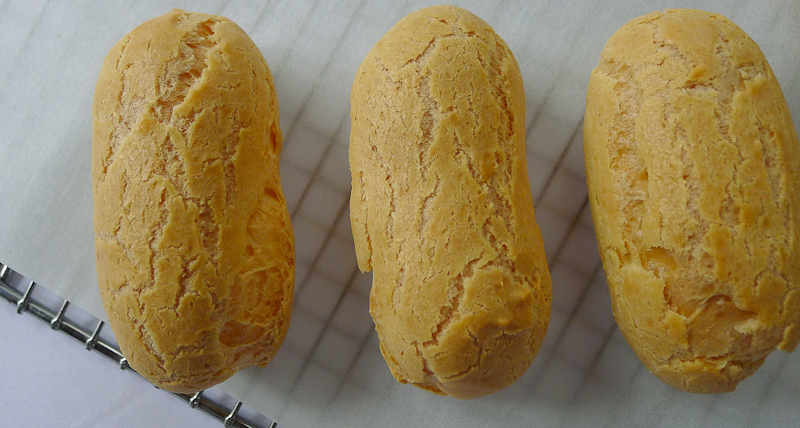
These Creme Brulee Eclairs were definitely a challenge.  I knew the creme brulee pastry creme would be less firm than regular pastry creme .  I decided that I would slice the eclairs in half and fill them that way, rather than trying to fill them with a pastry bag .  My reasoning was that I was fearful that the torch to brulee the tops would melt the filling.  I should have been more fearful about burning the tops of the eclairs !  Since I had a rounded surface to work with, the sugar kept falling off . And the nooks and crannies associated with eclairs started to burn around the edges. I set quite a few on fire ! Trust me,burnt sugar and burnt pastry are not very tasty.

I decided I wasn't going to have a four alarm fire going inside Ruby down at the coast so I opted to finish these off at home.  And I opted to give up the torch and use my copper caramel making pot !  I burned a few finger tips while dipping the tops but we all have to make sacrifices-and well worth the pain for the taste. The creme brulee filling was creamy and tops were caramel crunchy.  Just like a spoonful of creme brulee with the added taste of crispy pastry.


I used my new go to recipe for eclairs from Tom Douglas's book: The Dahlia Bakery Cookbook.  His recipe produces perfect eclairs every single time ! And I used Joe Pastry's recipe for the creme brulee.  For the hard crack caramel topping I cooked 2 cups of sugar with 1/2 cup water over medium high heat until it turned a nice amber color-about 15 minutes.  Once you take the caramel away from the heat you have to work quickly because it's still cooking in your pot-be careful , it's extremely hot !  I dipped each top into the caramel very carefully.  After the caramel hardened I filled the other half of the eclair with the creme brulee filling and placed the two halves together-Voila !


Oh, I almost forgot to share with you the good fortune that came my way this week !  The HuffPost Taste Section used my photo of my Kouign Amann posting  from April 2011.  When I got the email from them I thought it was a scam or virus and almost didn't open it . So glad I did-that news was like the icing on the cake after our wonderful weekend ! Thank you Huffington Post !


Tuesday, December 4, 2012

Maple Eclairs-My Dirty Little Secret


I haven't told anyone and now I'm telling all of you, shhhh, I'm addicted to Tom Douglas's Maple Eclairs. There I've said it and now I don't have to hide my dirty little secret anymore.  But I do have to hide the Maple Eclairs.  Oh my goodness, what deliciousness in an eclair-thick maple pastry cream,lighter than air pate a choux pastry,and topped with a light crunchy maple sugar glaze.

Before I dropped out of Pastry School, I was working on perfecting 3 things-Eclairs,Croissants and Ciabatta.  The holy trinity of my pastry repertoire .  I'm still working on perfecting them,but I've come very very close to the perfect eclair -Thanks to Chef Tom Douglas.  The pate a choux-so easy, the maple pastry cream so thick and smooth and the maple sugar glaze-genius.  I wish I could publish the recipe here. But my practice has always been that if it isn't published on the Internet already , I won't post it on my site.  I believe in supporting the Chef, so buy the book.  Get to your computer quickly click HERE  to buy it .


It's a beautiful cookbook,tons of photos,tips and how to instructions-hint hint-it would make a great Christmas gift for that baker in your life.  Or even better,  treat yourself.  I couldn't stop drooling over most of the recipes and my first attempt did not disappoint.  I have the puffiest eclairs still rising  in my oven.Beautiful roly poly shapes ( I made them slightly smaller than Chef Douglas recommends) and golden brown.


It's taken everything to not open the oven and  try one. I plan on working my way through this cookbook and cooking and baking every single recipe in it and I encourage you to do the same.


But back to the Maple Eclairs-imagine a maple bar with thick luscious maple pastry cream-heaven . I couldn't find a recipe for eclairs close to the one in The Dahlia Bakery Cookbook.  Many have similar or exact ingredients,but none seemed to match the oven temperatures used and cooking times.

I will share a little tip with you -Chef Douglas recommends filling the eclairs from the top-that way the glaze seals the filling in and it won't squeeze out from the bottom as you eat the eclair.


When I was in Pastry School, The Dahlia Bakery was at the top of my list for bakeries I  would dream about an internship there as I precisely cut my Napoleons or piped my little pate a choux swans.  But life always has little surprises around every corner. One of those little surprises popped up in the Fall of 2008 and I left school-I thought I might return,but never did.  It was one of the best experiences of my life, I will never forget what I learned and I now use this blog to recreate those experiences in my own kitchen. But, like Old Blue Eyes sings:
"Regrets, I've had a few 
But then again, too few to mention 
I did what I had to do and saw it through without exemption 
I planned each charted course, each careful step along the byway 
And more, much more than this, I did it my way "


I've said it hundreds of times before,everything happens for a reason.  I accept the change ,sometimes laughing,sometimes crying.  I throw myself into what life throws at me.  Someone once told me that I live my life like it is all or nothing at all; and that I needed to find a better balance in my life.  Do you understand  when I say all or nothing at all is my balance ? I love where it has taken me and what it has taught me .So now I think I will have another Maple Eclair and ponder where it will take me next. Bon Appetit !


Monday, December 3, 2012

Sriracha Deviled Eggs


 I'm doing a quickie post today !  I've been working on recipes and some crafty things for our Family Christmas Celebration in Seabrook.  But I didn't want to wait until Christmas to post this recipe. If you are looking for a fabulously simple appetizer to add to your  repertoire this is it .  Incredibly delicious with just the right amount of spice.  Definitely a keeper-hope you like them as much as I did. I found this recipe on a lovely little blog called Life's Ambrosia

Sriracha Deviled Eggs

Makes 12
You will need:
6 hard boiled eggs
3 tablespoons mayonnaise
1 tablespoon Dijon mustard
2 teaspoons Sriracha
1 tablespoon minced onion
1/2 teaspoon garlic powder
salt and pepper
chopped green onions for garnish

Peel eggs and cut in-half lengthwise.

Scoop all yolks into a bowl and mash with a fork. Add mayonnaise, mustard, Sriracha, minced onion and garlic powder. Stir to combine. Season to taste with salt and pepper.

Use a spoon or piping bag to fill each half of an egg with mixture. Squirt a dab of Sriracha sauce on top of each egg, sprinkle with green onion and serve.


Thursday, November 8, 2012

Family and Chocolate Salted Caramel Cupcakes


I love my family.  That's it.  I'm always grateful that through the workings of the Universe we all ended up living within a short drive of each other.  That's a feat unto itself considering we were scattered like ashes all over the country for such a long time.    We lived in Utah, Florida, Colorado, Oregon, Arizona, California,Pennsylvania, Massachusetts,and Virginia.  How did it happen that we all ended up living in Washington ?  We never had a family meeting to say: "Let's all move to Washington".  But somehow our spirits,our souls and our family bond brought each us together.

My sister and brother

Mel,Martha,Jorge,Deb

 I know we had to each find our own path in life and follow our wandering souls and we did.  If you put together a list of previous addresses and former jobs of ours,well the addresses I'm sure would number in the hundreds and the jobs probably in the fifties.  What were we searching for all those years ?  I've always believed it to be a home.  No matter where we were living or what we were doing we stayed close to each other-I have no memories of sibling rivalry or fights or not speaking (other than a few brief moments when we were pre-teens!).
Growing up 

Our common bond was the dysfunctional family we grew up in. We protected and loved each other while the craziness swirled like a cyclone around us. That love got us through some very difficult times; the untimely deaths of close friends; two aunts and an uncle killed in a plane crash; suicide of our mother; and all the baggage that came with these events.  We watched relatives fight over possessions and vowed we would never become them.  We watched relatives quit speaking to each other and vowed we would never do that.  It wasn't easy to make it to where we are today.  We all have probably funded the college education of a great deal of children of our therapists ! And here we are many many years later-still speaking,still loving and still bonded together by our love. I love that we can get together to celebrate each other.  And this past weekend we celebrated J's birthday and Mel & Martha's upcoming wedding in Hawaii.

Mel and Martha

J

Instead of a cake I decided to do cupcakes for our celebration.  And not just any ordinary cupcakes !  I made Martha Stewart's Chocolate Salted Caramel Cupcakes.  So rich and so good.  These are some of the richest cupcakes I have ever made. Well worth the effort for the family I so dearly love. 


The Cupcakes
Ingredients
1 1/2 cups all-purpose flour 
3/4 cup unsweetened Dutch-process cocoa powder
1 1/2 cups sugar 
1 1/2 teaspoons baking soda 
3/4 teaspoon baking powder 
3/4 teaspoon salt 
2 large eggs 
3/4 cup buttermilk 
3 tablespoons vegetable oil 
1 teaspoon pure vanilla extract 
3/4 cup warm water 

Directions
Preheat the oven to 350°F. Line mini muffin tin with paper liners. Whisk together flour, cocoa, sugar, baking soda, baking powder, and salt. With mixer on low speed, add eggs, buttermilk, oil, extract, and the water; beat until smooth and combined.

Spoon the batter into liners about two-thirds full. Bake approximately 15 minutes, or until tester comes out clean. Transfer tins to wire racks and allow to cool for 10 minutes; turn cupcakes onto racks and let cool completely. Cupcakes can be stored overnight at room temperature, or frozen up to 1 month in air tight containers.

To finish, use a paring knife to cut a cone-shaped piece (about 1/2 inch deep) from the center of each cupcake and throw away the pieces. Spoon 1 to 2 teaspoons warm Salted Caramel Filling into each hollowed-out cupcake. The caramel will sink into the cupcake a little, just fill it up each time it sinks-this takes about 30- 45 minutes for the caramel to finally settle. Sprinkle a pinch of sea salt over the caramel filling.

Use a pastry bag with a medium open-star tip  and pipe Dark Chocolate Frosting onto each cupcake, swirling tip and releasing as you pull up to form a peak. Garnish each cupcake with a pinch of sea salt. Cupcakes are best eaten the day they are filled and frosted. Store at room temperature in airtight containers - do not refrigerate or your caramel will harden !


Salted Caramel Filling
Ingredients:
2 1/2 cups sugar 
2/3 cup water 
1 tablespoon light corn syrup 
3/4 cup heavy whipping cream 
2 1/2 teaspoons sea salt, preferably fleur de sel 

Directions
Heat sugar with the water and corn syrup in a heavy saucepan over high, stirring occasionally, until syrup is clear; clip a candy thermometer to side of pan and stop stirring.

Cook until syrup comes to a boil, washing down sides of pan with a wet pastry brush as needed. Boil, gently swirling pan occasionally, until mixture is caramelized and just reaches 360°F. Remove from heat and slowly pour in cream; stir with a wooden spoon until smooth. Stir in sea salt.

Use immediately; if caramel begins to harden reheat gently.


Dark Chocolate Frosting
Ingredients:
1/2 cup plus 1 tablespoon unsweetened Dutch-process cocoa powder
1/2 cup plus 1 tablespoon boiling water 
2 1/4 cups (4 1/2 sticks) unsalted butter, room temperature 
3/4 cup confectioners' sugar, sifted 
1/4 teaspoon salt 
1 1/2 pounds best-quality semi-sweet chocolate, melted and cooled ( I ran out of semi sweet so I used bittersweet and it was delicious )

Directions:
Combine cocoa and boiling water, stirring until cocoa has dissolved.

With electric mixer on medium-high, beat butter, confectioners' sugar, and salt until pale and fluffy. Reduce speed to low. Add melted and cooled chocolate, beating until combined and scraping down sides of bowl as needed. Beat in the cocoa mixture. 

Frosting can be refrigerated up to 5 days, or frozen up to 1 month in an air tight container. Before using, bring to room temperature and beat on low speed until smooth again.


You don't choose your family. They are God's gift to you, as you are to them. 

Desmond Tutu